Buildings
Materials
Industry
Gameplay Lessons
First steps
User interface
Your economy
Operations
Building rules
Military ops
Strategy hints
Reference
Buildings
Mining
Reports
User Interface and Gameplay
The user interface is designed so that the things you have to do are easy to do, and so that the information you need to make a decision is always handy. The interface is divided in five areas that serve different functions:
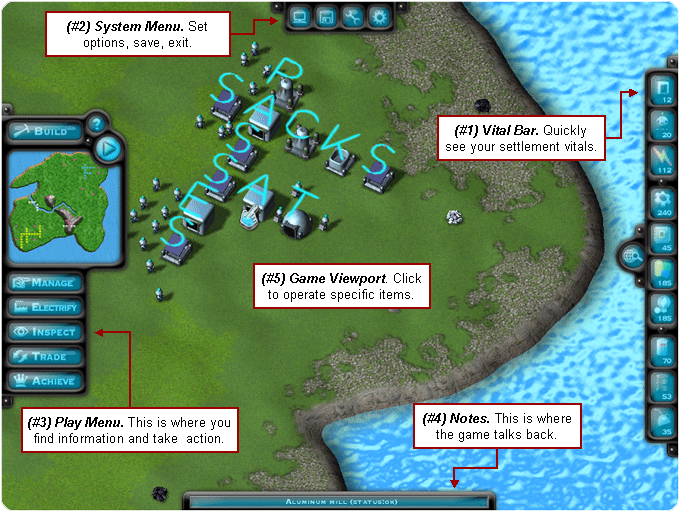
- Vital Bar: Shows key settlement stats at a glance and opens the view filters.
- System Menu: Set options, pause, save, exit the game.
- Play Menu: This is where you find information and take action.
- Notes: Game time and status, moused-over game items descriptions.
- Game Viewport: Click on individual buildings to operate them.
Pressing F1 or clicking on the "?" button brings up a quick in-game help window. If you mouse over pretty much anything in the game, the Notes window at the bottom of the screen will give you a descriptive reminder of what you are looking at. Go ahead, try it!
World Navigation
You will do quite a lot of exploring in the game, so let's first learn how to move the view around the island. Most new players will do this with the mouse:
- To move around: Hold the left mouse button for few seconds and drag. You can also move the pointer close to the screen edge, and the camera will automatically pan in that direction.
- To zoom in or out: Hold the right mouse buttons for few seconds and drag up or down. Rotating the mouse wheel (if you have one) will do the job too.
- To rotate the camera: Hold both mouse buttons for few seconds and drag.
Clicking on the minimap will move the view to the clicked location. You might have already noticed the buttons that pop up when hovering over the minimap. These buttons provide shortcuts to some common ways of looking at the world:
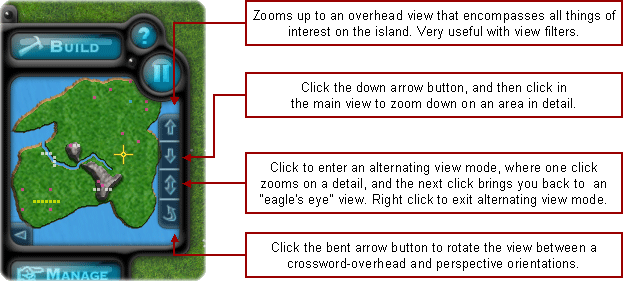
Players who prefer to navigate with the keyboard can do it as follows:
- Arrow keys: Slide the view to the left, right...etc.
- Keypad +/-: Zoom in and out.
- PageUp/PageDn: Increase or decrease camera elevation.
- Ins/Del: Rotate camera around.
- Space: Pause or resume game (version 2.7 and later).
- 1/2/3/4: Set game speed (version 2.7 and later).
- U/D/A/R: Equivalent to the minimap view shortcuts (version 2.7 and later).
- B: Open the word builder window (version 2.7 and later).
- M/I: Open the management and inspection control panels (version 2.7 and later).
The Vital Signs Bar and View Filters Button
The vital signs bar shows the wealth of your settlement at a glance:
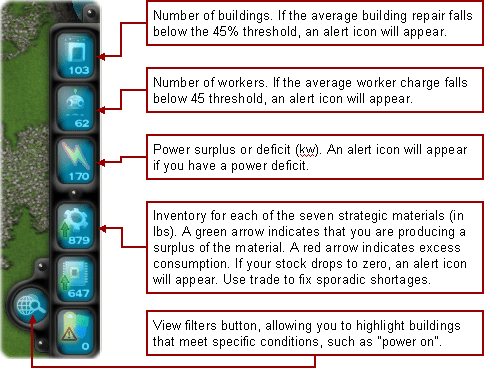
Clicking the buttons on the vital bar will open control panels where you can diagnose problems and take action. Watch out for alert icons on the vital signs bar:
- Power shortage: When supply outstrips demand, some factories will be put on standby. To fix that, build more [S], power up your [G] if you have fuel, or shut down unessential buildings.
- Low building maintenance: Because building maintenance is automatic, this usually indicates a vital material shortage. Buildings in disrepair work poorly, and may cause your economy to stall.
- Low robot charge: This indicates either a shortage of vital materials, or lack of enought [I]nfirmary buildings. Discharged robots move slowy and may cause your economy to stall.
- Materials shortage: The seven vital materials
used for construction and maintenance are parts, electronics, plastics, glass, batteries, lubes and fuel. A long-term shortage of even one of them will prevent maintenance and cripple your settlement. You can trade to fix point shortages due to rapid construction, but in the long run, a strong and sustainable industry is the key to success. The usual cause of chronic shortages are not enough factories, not enough power/workers/storage, and inefficient placement of buildings.
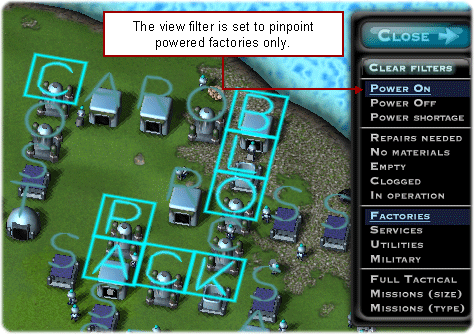
An important element on the Vitals Bar is the World View Filter button. It will prove highly useful as your settlement grows and you have to face multiple challenges at once. As shown above, it allows you to highlight specific buildings based on combinations of criteria you chose. You can locate supply problems, power shortages, maintenance issues at a glance. You can slide and dice by building type and function. You can also overlay vital military information on this real-world economic map of your settlement. Click on "Clear Filters" to restore the normal world view, and right-click to close the View Filter Panel.
System Menu
As shown below, the system menu buttons control HOW the game plays. Perhaps the one you will use the most is the set speed button. The game has four speeds, and you can choose the pace that fits best the current situation. You might find out that combat is better done at a slower pace. The speed selector can be also activated by right-clicking the big game pause-resume button above the map. Right-click the speed selector to close it.
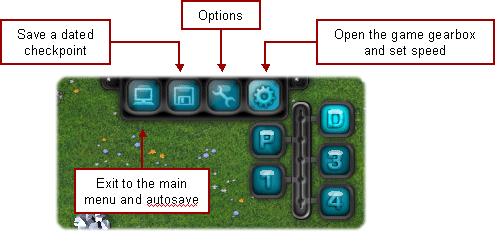
When you exit to the main (intro) menu, the game will automatically save itself. Next time you play, you can resume the last saved game, or load a game that you have saved explicitly as a checkpoint. Please remember that the autosave file gets refreshed every time you return to the intro menu. If you want to save the game at a specific time, save it as a checkpoint.
The options button brings up a dialog where you can set game options, and adjust the volume of the three game audio channels - music, game effects, and interface sounds. Two game options deserve notice. The first allows you to automate some tasks, such as trading or combat. The second allows you to reset and replay the game tutorial.
Play (Main Game) Menu
The play menu is where you take action and find information. It is organized in a way that puts the most common game actions one click away from the user, while also providing easy access to advanced controls for expert players. Let's begin by an overview of what the play menu does:
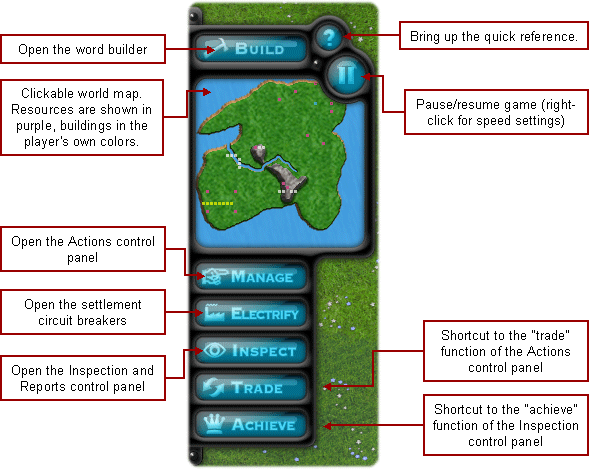
- The BUILD button on top brings up the Word Builder,
explained on the Building Rules page.
- The MANAGE button brings up the Actions Control Panel,
where you manage all global aspects of your robots, buildings, priorities, inventories and strategy.
- The ELECTRIFY button brings up your settlement circuit breakers, where you can power up or down entire
manufacturing and service building groups,
and review how busy they are. Very handy for large settlements.
- The INSPECT Inspection and Reports Control Panel,
where you can find information on virtually every aspect of your settlement - from the essential to the arcane.
- The TRADE button is an often-used (and sometimes abused) shortcut to a tab in the Actions Control Pane, where you can
trade for materials that you need.
- The ACHIEVE button is another often-used shortcut to a tab in the Inspection Control Pane that shows you a
recommended growth trajectory (in terms of what
letters to build next) and an overall level grade for your settlement.
- The HELP button brings up a brief in-game reference, intended to remind intermediate players of what each letter does, of
the game basic economic model, building rules, and of common pitfalls.
A guided tutorial will show first-time players how to use the Play Menu. Because the tutorial is not available with some of the advanced scenarios, we strongly recommend to choose an easy scenario, such as "Abundant Welcome" for your first game. Please take your sweet time to follow the tutorial. If something seems unclear, you can reset the tutorial to the beginning by starting a new game and clicking on the "tutorial" selector in the Options/Gameplay.
Play Menu: Actions Control Panel
The Actions Control Panel contains a broad collection of controls for all global aspects of your settlement. It is divided in five sub-panels, described below. Each sub-panel is dedicated to a particular aspect of your settlement and provides a number of tabs for different control functions.
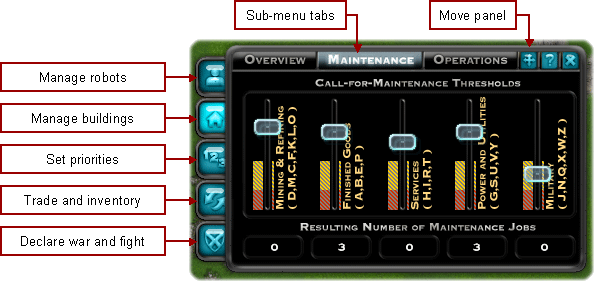
- The Robots button on the Actions Control Panel brings up tabs where you can review what your
workers are doing, and control their
recharging levels. You can also
use it so schedule automatic construction of new workers and fighters.
- The Buildings button on the Actions Control Panel brings up tabs where you can review your building mix, performance,
and set up maintenance level targets.
- The Priorities button on the Actions Control Panel brings up tabs where you can decide which
materials,
tasks and
industries
receive preferential attention.
- The Trade button on the Actions Control Panel brings up tabs where you can review your stocks and
trade for materials that you need.
- The Shields button on the Actions Control Panel brings up tabs where you can compare with your opponents,
declare war, and manage various aspects of combat.
As you can see, the Actions Control Panel contains tons of stuff, which is better explained in the chapters on the settlement economic model, operations, and military strategy. In our experience, novice players use mostly the trade tab and leave the bulk of other settings and sub-panels alone. That's ok! As your mastery of the game grows, you will discover that the panels such as Priorities open a whole new world of strategic refinements to you to give you an edge in tough scenarios.
Play Menu: Inspect Control Panel
The Inspect Control Panel contains a broad collection of stats and reports about virtually every aspect of your settlement. To help you see what is happening, it is divided in four sub-panels:
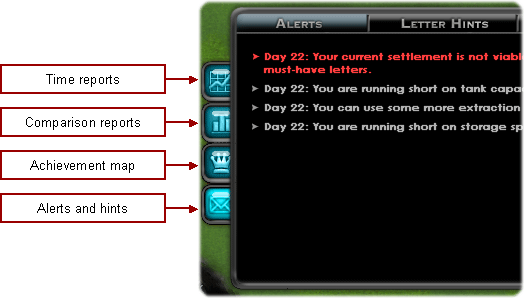
- Time reports, which show you the trend of virtually every facet and metric of your settlement. The reports are not really needed
in the beginning, but you will find them priceless as the game advances. The reports are fairly self-explanatory, but you can learn more
about them in the reports reference.
- Comparison reports, which show how you stack up against your opponent(s) - at least for those metrics that you are allowed to peek into.
Be careful not to fall too far behind your opponents, least you give them an incentive to attack you first.
- Achievement map, which suggests how to grow your settlement.
- Alerts of things that require your attention; and hints as to which letters you need, and good words you can build with the current layout/resources.
Check out your alerts periodically. You do not want to miss out on your opponent gearing up to attack you...
Most novice players rely on the achievement map, so it is worth saying few words about it here. Its purpose is to provide a sense of progress and guide non-expert players with the proper development of their settlement. As you may have already gleaned, it is important to build the right letters at the right time, and not build too many unneeded letters. But how do you know when and how much? This is what the achievement map is for. It tells you what letters to build first to get the most basic infrastructure in place. Once this is done, it tells you what is the next level goal and how many of which letters you need to reach it.
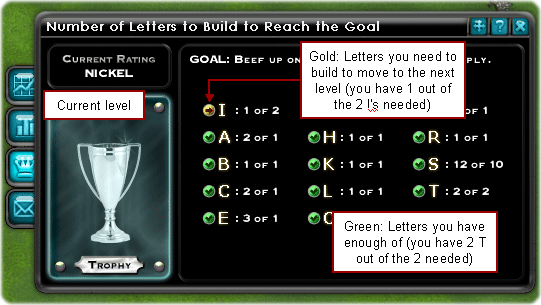
Bear in mind that the achievement map is for an average settlement, and reaching the top level does not guarantee victory. You win by kicking the other robots off the island, regardless of the means. The achievement map indicates a reasonable growth trajectory to guide new players in that direction. Once you gain experience and master the workings of your settlement, you will discover that there are many reasons to depart from the map recommendations and optimize your approach - each one specific to the scenario and opponent you play.
The Notes Window
The small notes window at the bottom of the screen is quite useful. Normally, it displays the game time and status. The time in the game is days. At normal speed, one game day is approximately one minute of real-world time. It usually takes about 60-90 game days to build a large settlement, and 120-150 game days to win. The game status can be peacetime, war, or "clouds of war" - the latter meaning that your opponent is considering attacking you.
When you mouse over almost anything in the game, it will be described in the notes window too. Go ahead and try - it's a great way to learn the game.
The Game Viewport and Screen Modes
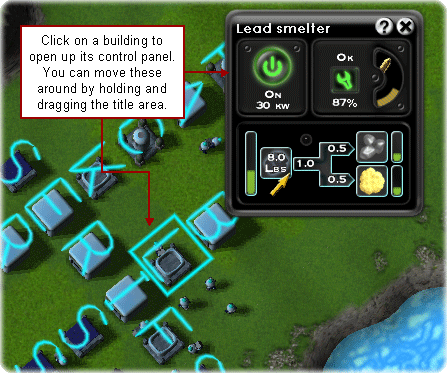
When you click on your buildings in the game viewport, a Control Panel specific to that building will open. Most buildings can be basically turned on and off, but some (such as J and N) have extensive control interfaces for executing combat missions. The building control panel will also show you maintenance and other operational information for the select building, and is a great way to deep dive into finding problems and opportunities. You can move the control panel by holding and dragging the title area where the building name is displayed.
In full screen mode, the game viewport can be run up to the max resolution your graphic card and monitor support. You can truly see everything at 2560x1600 pixel resolution if the hardware allows it. You can also downscale the resolution, which will show less of the world, but will magnify the user interface and its contents. The game can be also ran in windowed mode.


